
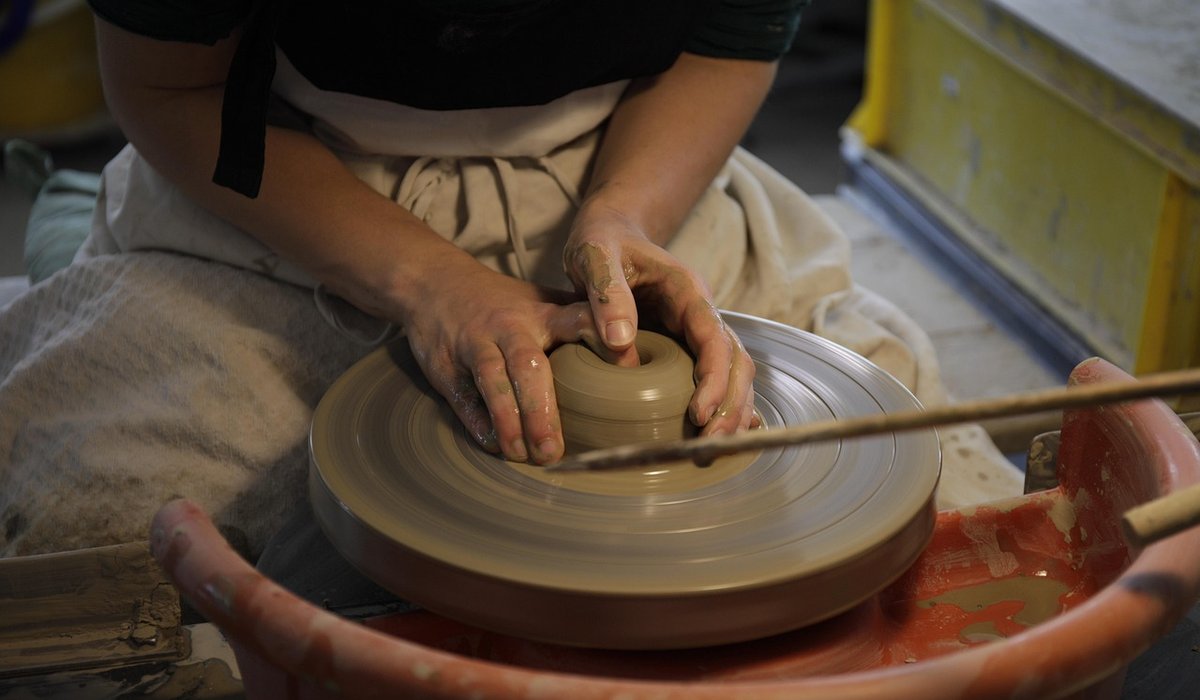
How to Pull Up Even Walls on the Wheel
Why Even Walls Are Worth Chasing
A pot with even walls feels right before you can explain why. It sits light in the hand, rings cleanly when you tap the rim, and takes a glaze without patchiness. Uneven walls do the opposite: thick bellies crack in the kiln, thin patches blow out, rims wobble, and trimming turns into a rescue mission.
A useful set of targets to work towards: walls of around 4–6mm on a mug or bowl, with a base of 6–8mm. Garden planters can be a little heavier at 8–10mm, but they still need to be consistent all the way round. Throwing is a skill of repetition, and evenness is the part that separates a beginner's pot from a maker's pot.
Begin with a Level, Well-Compressed Base
Most uneven walls start before you ever pull a wall up. If the floor of the pot is wedge-shaped or thicker on one side, the clay has nowhere to travel but upwards unevenly, and every later pull inherits that fault.
Centre thoroughly at a fast wheel speed, then slow down and open the clay outwards with the heel of your hand, working from the middle to the edge. Flatten the floor with a wooden rib, pressing from the centre outwards in overlapping strokes. Leave the base a touch thicker than you want the walls — it will firm up and can be trimmed later — but make sure it is level all the way across.
How wide you open the base decides how much clay you have for the walls. A wide, thin floor leaves too little material to draw upwards; a narrow, chunky one gives you plenty of clay but a heavy pot. Aim for a floor width that suits the profile you want, then leave it alone.
Pinch Before You Pull
This is the step most potters skip, and it is the single best habit for even walls. Before you draw anything up, pinch the wall between your thumb inside and your fingers outside, working from just above the base to the rim in small, overlapping increments.
- Keep the clay damp but not sloppy — a light film is plenty. Too much water and the wall will collapse on the first pull.
- Pinch all the way round at least twice, turning the wheel by hand or rotating your body so you cover each quarter evenly.
- You are not trying to make the wall thin here, only to make it uniform and to feel where the thick and thin places are.
Doing this early means you can correct problems while the wall is short and easy to read, rather than when it is tall and your fingers are guessing.
Pull Slowly from Base to Rim
Set the wheel to a moderate speed — faster than opening, slower than centring. If you cannot clearly see the profile as it turns, you are going too quickly. Place your thumb inside at the base of the wall and your fingers outside, then draw upwards in one slow, uninterrupted movement all the way to the rim.
Each pull should take somewhere between eight and fifteen seconds. That sounds slow, and it is. Rushing creates tears, thick ridges and a wall that thickens and thins in stripes. Squeeze a little more firmly at the base and ease the pressure as you rise, because the top of the wall is thinner and far more fragile than the bottom.
Two or three good pulls will make a mug. Between each one, sponge away the slip and let the wall firm for a moment — the clay will hold its shape better on the next pass.
Keep Pressure Steady and Hands Supported
Consistency comes from your whole body, not from your fingertips. Sit close to the wheel, tuck your elbows in, and rest your forearms on your thighs or the wheel pan. Brace one hand against the other so both move as a single unit, with the inside hand leading very slightly.
Think of the pressure as equal and opposite: the inside pushes gently out, the outside pushes gently in. Uneven walls usually mean one hand is working harder than the other. Keep the same posture every time you sit down, so your muscles learn the sequence rather than reinventing it on each pot.
After every pull, pause and look at the silhouette against a plain background. A cheap profile gauge or even a sheet of card held behind the pot will show you thick patches you would otherwise only find when trimming.
Common Causes of Uneven Walls — and How to Fix Them
- Thick base, thin rim: your hands rose too fast at the start. Press a little harder at the bottom, then ease off as you climb.
- Spiral ridges or a cork-screwed wall: the wheel is too fast or your hands are rising too quickly. Slow both down and overlap each turn.
- A single thin patch that stretches on every pull: often an air pocket from insufficient wedging. Wedge more thoroughly and avoid pushing that spot further.
- One side noticeably thicker: your hands have drifted out of alignment. Keep your eyes on the rim and try a mirror behind the wheel to catch the habit.
- A heavy, lumpy rim: don't leave excess clay up top. The final pull should carry clay up from the wall, and a damp sponge or chamois can tidy the rim afterwards.
Pick one fault at a time and throw a batch of small cylinders deliberately working on it. Even walls are not a talent — they are the result of a slow pull, an even pinch and hands that stay braced together. Give yourself twenty pots and you will feel the difference in your fingers long before you see it on the shelf.
tag: Wheel Throwing

Sophie Ashworth Author
Turn leather-hard pots on the wheel to refine foot rings and create balanced forms without distorting delicate walls.
YOU MAY ALSO LIKE
Trimming and Shaping Leather-Hard Pots Successfully
Sep 19
10Create bowls and cups by pinching clay between thumb and fingers, then smooth surfaces with a damp sponge.
read more
Pinching Pots for Simple Functional Tableware
Sep 15
10Build height gradually by joining coils with slip and scoring, blending each seam before the clay dries completely.
read moreWheel Throwing
-

ERRIC CATONA
Construct sturdy boxes by cutting accurate slabs and joining mitred edges with slip, then reinforce internal corners for strength.
May 19, 2016 at 5.12 pm
Reply
ERRIC CATONA
Learn how silica, alumina and fluxes interact to create durable glazes that fit your clay body well without crazing.
May 19, 2016 at 5.12 pm
Reply -
ERRIC CATONA
Achieve smooth glaze layers by dipping pots quickly, stirring the bucket often, and wiping the base clean before firing.
May 19, 2016 at 5.12 pm
Reply
Hand Building
Your email address will not be published.